
Forget Everything You Know About Ramen. We’re Making the Real Deal.
Your relationship with ramen probably started in a dorm room, with a crunchy brick of noodles and a sad little foil packet. You boiled water, you felt a tiny thrill of independence, and you ate something that tasted vaguely like salty cardboard. That’s okay. We’ve all been there. But friends, that was not ramen. That was a cry for help.
Real ramen is a hug in a bowl. It’s a cloudy, savory, soul-warming masterpiece that takes work, patience, and a little bit of crazy. I’m not going to lie to you—this isn’t a “quick weeknight dinner.” This is a weekend project. It’s the culinary equivalent of building a bookshelf from scratch instead of buying one from IKEA. More sweat, way more pride.
So, why bother? Because once you taste homemade ramen broth, the kind that’s been bubbling away for half a day, you can’t go back. It ruins you for all other soups. In the best way possible.
The Big Secret: It’s Not Soup, It’s a Layer Cake
Think of your favorite simple soup. Maybe chicken noodle. You throw stuff in water, simmer, salt it, done. Cozy. Easy.
Ramen broth scoffs at that. It’s a diva. It’s built in layers, like a fancy cake or a complicated skincare routine.
- The Broth (The Base): This is the long-simmered stock. Bones, water, time. It’s actually pretty bland on its own. Its job is to be rich, creamy, and feel like liquid velvet on your tongue.
- The Tare (The Personality): Pronounced “tah-reh.” This is the secret sauce. A super-concentrated shot of salty, umami flavor—usually soy sauce, miso, or just straight-up salt. You add it to your empty bowl first. This is what makes the ramen taste like ramen.
- The Oil (The Shine): A flavored oil (garlic, ginger, chicken fat) drizzled on top. It adds aroma, flavor, and a beautiful glossy finish.
You combine these three in the bowl, then add noodles and toppings. This layering is the magic trick. It’s why ramen broth has a depth of flavor.
Your Mission, Should You Choose to Accept It: Tonkotsu Broth
We’re making Tonkotsu. It’s the classic creamy, white, pork bone broth from Japan. It looks impressive, tastes unbelievable, and requires you to be best friends with your stove for a day. Let’s gear up.
What You’ll Need (The Hardware):
- A MASSIVE pot. Seriously, dig out the biggest one you have, the one you use for chili at a football party. Things will bubble.
- A fine mesh skimmer (a slotted spoon works in a pinch). You’ll be fishing stuff out.
- A colander and a strainer. For the big finale.
- A ladle, a knife, and a cutting board. Your old kitchen pals.
- (Optional but helpful) A kitchen scale. For when we get fancy with the seasoning.
What You’ll Need (The Software):
- ~5 lbs of pork bones. Ask your butcher for “soup bones” or a mix of neck bones and pig’s feet (trust me, the feet are the gelatin secret!). Get them chopped into fist-sized pieces.
- A whole head of garlic. Don’t you dare peel it.
- A big knob of ginger. Skin on? You bet.
- One onion. Halve it. Skin stays.
- Water. Lots of it.
The Process: A 12-Hour Love Story
STEP 1: THE BONE SPA DAY (1 Hour)
This is the most important step. Do NOT skip it. Your bones are dirty. They have blood and bits that will make your broth taste funky and look gray.
- Dump all your bones in the giant pot. Cover them with cold water.
- Bring it to a raging boil. Let it roll for a good 10 minutes. You’ll see a disturbing amount of gray foam rise to the top. This is the “impurities.” We don’t want them.
- Dump the whole pot, bones and nasty water, into your sink. Rinse each bone under cold water, giving them a little scrub. Your bones are now clean and ready for their transformation.
STEP 2: THE MARATHON SIMMER (The Next 12-18 Hours)
- Put the clean bones back in the clean pot. Cover them with fresh, cold water—about 4 quarts.
- Bring it to a boil, then immediately turn it down to the lowest heat that keeps a few gentle bubbles popping to the surface. This is a simmer, not a boil. A boil makes broth bitter and greasy. A simmer coaxes out the goodness.
- THE SKIMMING VIGIL: For the first few hours, foam will keep appearing. Grab a chair, a book, your phone, and camp out. Skim the foam off every 20-30 minutes. It’s meditative. This is your broth’s skincare routine.
- After about 6 hours, toss in your garlic, ginger, and onion. Let the party continue.
- Now, you wait. Go watch a movie. Do laundry. The pot will slowly work its magic. The water will turn from thin and clear to milky, then creamy, then opaque white. This is the collagen and marrow from the bones emulsifying into the liquid. This is the goal.
STEP 3: THE SIMPLE SECRET SAUCE (Tare)
While the broth bubbles, make the tare. It takes 5 minutes.
- In a small pan, mix ¼ cup soy sauce, 1 tablespoon of mirin (sweet rice wine, find it in the Asian aisle), and 1 tablespoon of sake (or dry sherry).
- Add a small piece of dried kombu seaweed if you have it (another umami bomb).
- Heat it until it’s just about to simmer, then turn it off. Let it sit. Strain it. Done. That’s the flavor punch.
STEP 4: THE GRAND FINALE (Assembly)
Your broth is done when it’s creamy, rich, and coats the back of a spoon. Strain it through a colander to get the big bits out, then through a fine strainer to make it silky smooth.
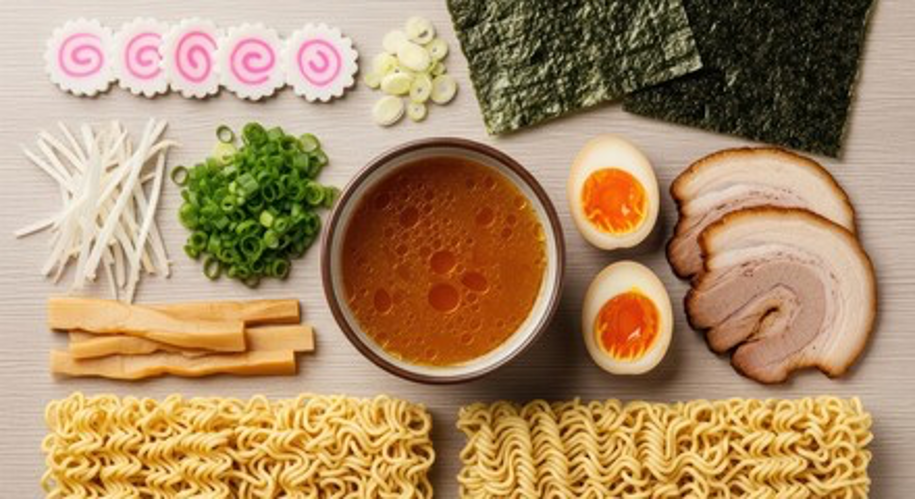
To build your bowl:
- Put 1.5-2 tablespoons of your tare in the bottom of a warm bowl.
- Ladle in about 2 cups of your piping hot broth. Hear the sizzle as it hits the tare? That’s the sound of flavor being born.
- Add your cooked noodles (cooked separately in unsalted water!).
- Top with a soft-boiled egg, some sliced pork, green onions—whatever makes you happy.
- Drizzle with a little sesame oil or chili oil. Admire your creation. Then, slurp. Loudly. It’s polite.
Mistakes You’ll Probably Make (I Did)
- Boiling it like crazy. Don’t. Gentle bubbles. Always.
- Adding salt to the big pot. No! The tare seasons the soup in your bowl. The big pot stays pure.
- Cooking the noodles in the broth. This turns your silky broth into starchy glue. Always cook noodles in a separate pot.
- Getting impatient. If you try to make this in 3 hours, you’ll get pork tea, not ramen broth. The time is non-negotiable.
The Shortcut for the Realistic (No Judgement)
Don’t have 18 hours? I get it. Life happens.
The Pressure Cooker Hack: Do the bone spa day. Then, put everything in a pressure cooker with water. Cook on high for 2-3 hours. It won’t be exactly the same, but it’ll be 90% there and utterly delicious.
The Afterparty: Leftovers
Broth freezes like a dream. Pour cooled broth into freezer bags or containers. It’ll keep for months. The tare keeps in the fridge for weeks. Future-you will be so grateful to present-you.
So, there you have it. It’s a project. It’s a commitment. But on a cold Sunday, when your house smells incredible and you’re holding a bowl of something you created from bones and time, you’ll understand.
It’s not just broth. It’s a pot of patience, a ladle of effort, and a truly unforgettable meal. Now, go find your biggest pot. Your ramen journey starts now.
Sources:
The Ultimate Guide to Ramen Broth: Types & Recipes – Otaku Ramen (https://otakuramen.com/blog/ramen-broth-guide#:~:text=The%20soul%20of%20most%20traditional,savory%20taste%20known%20as%20umami)
The Ultimate Guide To Ramen: The Humble Japanese Noodle Soup – Ari Black 10December2025 (https://int.japanesetaste.com/blogs/japanese-taste-blog/the-ultimate-guide-to-ramen-the-humble-japanese-noodle-soup#:~:text=While%20%E2%80%9Cinstant%20ramen%E2%80%9D%20is%20of,Japan%20and%20around%20the%20world
The Ramen Tare Framework – Culinary Crush (https://www.culinarycrush.biz/all/ramen-tare#:~:text=WHAT’s%20ramen%20TARE?,and%20almost%20always%20not%20ramen!)
Why Do You Boil Tonkotsu Broth for So Long? – The Story of Ramen (https://www.ramenpartysf.com/post/why-do-you-boil-tonkotsu-broth-for-so-long#:~:text=Now%2C%20back%20to%20our%20central,the%20many%20hours%20of%20boiling.)
Slurp Worthy: A Guide to the Different Types of Japanese Ramen Broths – Liki Ueno 04May2025 (https://bokksu.com/blogs/news/slurp-worthy-a-guide-to-the-different-types-of-japanese-ramen-broths#:~:text=Introduction:%20The%20Soul%20of%20Ramen,Bowl%20Starts%20with%20the%20Broth)
Tools I Use for Making Ramen at Home(Tonkotsu, Paitan & Shio)– Ramen Kaonashi (https://ramenkaonashi.com/tools/#:~:text=Stable%2C%20non%2Dslip%2C%20and,Thermometer)
A Beginner’s Guide to Ramen #1 – Broth – Brandon Muhawi Senior Food Writer at Pro Home Cooks